Benefits:
- Strengthens quads, hip flexors, abs, knees
- Stretches spine, shoulders, hamstrings, calves and hips
- Releases and stretches upper and lower back
- Calms the mind and relieves stress and tension
- Regenerates the nervous system, reducing fatigue and anxiety
- Stimulates liver and kidneys, ovaries and uterus
- Relieves stress and mild depression
- Improves digestion
- Helps relieve the symptoms of menopause and menstrual discomfort
- Soothes headache and anxiety and reduces fatigue
- Helps to eliminate accumulated toxins and boosts the functioning of your immune system, according to yoga teacher Nancy Gerstein in her book, “Guiding Yoga’s Light: Lessons for Yoga Teachers.”
Traditional Alignment cues:
From a seated position, straighten your legs forward. Flex your feet pointing toes to the sky and pushing through the heel. This activates the leg muscles as well as encourages a stretch in the calves. Hinge at the hips reaching forward while maintaining the natural lumbar curve. Ribs stay tucked, leading with your breastbone. Use your abs to draw forward. Head stays over shoulders. Shoulders stay rolled back, relaxed and down.
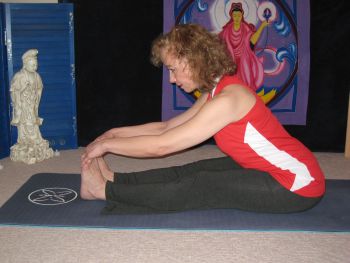
Never compromise your low back for the reach. I often tell my yoga students that if you feel a sensation, it’s good. It’s when that sensation “crescendos*” that you need to pull back.
*Yes, I know “crescendos” refers to volume and intensity of sound, but to me it also relays the message I’m trying to deliver to my students. Heck—I’ll bet your body wishes it could make a sound before it goes beyond its limit! So this term and when I use it has become what I like to call a “Sandyism” in class.
When you’ve come as far forward as you think your body wants to come while maintaining your natural lumbar curve, add a flex to the spine as you bring your head toward your legs. Your lumbar curve will release gently. Hands can rest on legs, ankles or feet. Or even on the floor. Knees stay pointing up. Once in the pose, use the breath to inhale and elongate, exhale and deepen if it feels good.
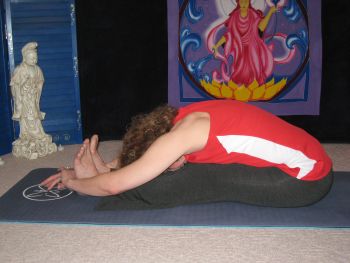
Not sure of your pose? Add a prop!
- Elevate hips as necessary with blanket or yoga mat to keep a neutral spine if you have tight hamstrings (not shown), or
- Use a strap as a prop to reach toward toes by placing the strap on the balls of the feet with either end in your hands as you walk your hands forward down the strap. (Not shown)
Alternative Option:
So where do you experience sensation in seated forward fold? The Leslie Kaminoff anatomy training introduced me to a whole new way to look at forward fold. It’s funny that I refer to it as a “new way” when it’s really the way the Sanskrit term defines it.
Paschimottanasana breaks down to mean “west” (Paschima) which refers to the back side of the body and Uttanasana—a standing forward fold. (Traditionally practice is done in the morning towards the rising sun in the east. So the back side of the body is considered the “west” side of the body.)
Another version (from Svatmarama) calls it Paschima Tana with Tana meaning to lengthen or spread out. It describes where the stretch occurs more than the shape change. It describes an experience vs. the shape. To experience the stretch on the west more evenly distributed across the whole back side of the body/superficial back line is going to be different for “every body”. Each person is different. We all have different starting points with where we feel the stretch.
Spinal flexion, for some, may or may not involve the experience of feeling the stretch on the whole back side of the body—depending on how you are doing the spinal flexion. You may be in what appears to be in a perfect forward fold, but the stretch could be coming from only a couple of places. For well distributed movement, you want a lot of little movement across a lot of places in the back/west side of the body. Finding out what is more useful so that you can experience a more evenly-distributed sensation/experience is the goal.
One of the main themes in Leslie’s trainings is that you should be looking for a little bit of movement in a lot of places vs. a lot of movement in one spot. Over-using one spot means you may be losing out on potential movement elsewhere along your spine. Consistently over-using one spot repeatedly also breaks your body down over time, creating repetitive stress and strain. You want to move the parts that can’t move so easily first to be able to more evenly distribute the movement. Healthy movement is well distributed movement.
“Flexion” refers to the relationship of the spinal curves to each other: An increase in the primary curve of the spine which corresponds to a decrease in the secondary curves—lumbar and cervical curves—of the spine. The goal of spinal flexion—the very definition of spinal flexion—is to experience a stretch across the whole superficial back line. It’s not just a stretch in the hamstrings, for example. Each of your spinal curves contributes to the flexion. The lumbar curve contributes the most at 60°. The cervical spine contributes 40° and the Thoracic spine contributes 45°. Focus on the areas of your spine that are the least flexible first to make sure you have well-distributed, maximum movement. If you go to the lumbar area first (the most able to flex), you may miss stretching areas that are least able to move.
In one of the oldest surviving texts on hatha yoga, the Hatha Yoga Pradipika, Svatmarama suggests putting the forehead on the thighs for spinal flexion. Krishnamacharya, often referred to as the father of modern yoga, suggests you “Lower the head and press the face down onto the knee. Face on knee.” Yes, you read that right! I, personally, consider these cues the direction you are heading, not necessarily what you’ll achieve! (Let’s just say my personal practice hasn’t achieved head to knee or thigh—unless I bend my knees, which we’ll touch upon later!)
Considering the goal of spinal flexion, forehead to knee or thigh is a good direction to shoot for. It decreases the cervical curve which is least flexible compared to the lumbar. It encourages more spinal flexion than simply hinging at the hip.
It’s all about creating the experience of a stretch evenly distributed along the whole back/posterior side—the whole superficial back line. How best to do that is what you look for. The pose is about an experience of even distribution of sensation. It’s not just about how the shape appears. Ask yourself “where is the stretch sensation occurring and where isn’t it?” Your answer will tell you whether it is distributed well or not. A well distributed stretch relaxes the nervous system so that one area is not overwhelmed.
Bending the knees in seated forward fold:
Typically you would suggest that the student with the tight hamstring or low back issues might want to bend their knees as they go into spinal flexion. What about a more flexible person? This was another aha moment for me!
A more flexible person is tempted to simply flop into forward fold, hinging at the hip—busted! Yet they are probably not feeling it across the whole back side of the body. By bending the knees and bringing your forehead toward them, you move your breath to fill the back side of the body which gets the stretch into the thoracic area of the spine. Below is my s-l-o-w progression toward my knees and as I make contact I started to release the knees toward the ground slightly.
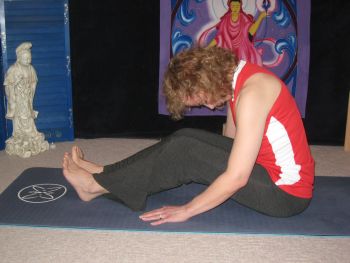
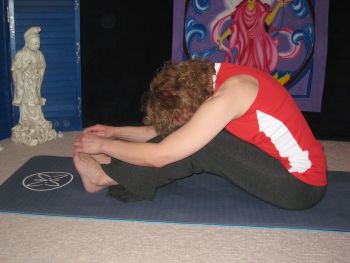
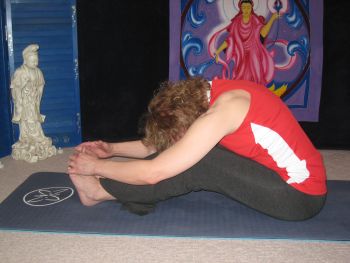
This opens the sides of the rib cage and the lateral muscles of the back. This helps to create full breathing for the back of the lungs—an area often forgotten about because we tend to think the lungs exist only on the front side of our body. The lungs are actually much bigger on the sides of the body and even deeper and bigger in the back.
The whole back line starts to engage. Bending the knees gives a better sense of lengthening. Engaging the front of the legs by bending the knees creates resistance to just flopping forward which creates a different sensation. That sensation can then be more evenly distributed and they will feel a more well distributed stretch throughout the whole back line of the body.
Also the bent knees helps to contract the front side of the body which helps the back side/antagonist muscles release. It helps to engage the abdominal area. Shortening the front body triggers a lengthening of the back body.
I’ve really been enjoying playing with this “new” old way to experience spinal flexion. Your body will too! Enjoy!
Contraindications and cautions:
- Contraindicated for back injuries.
- Bend your knees to protect the low back, especially if working with sciatica.
- Hamstring injuries (also bend your knees here)
Highlight on Headaches:
Tension headaches, the most common type of headache, can be triggered by bad posture, muscle fatigue, overtiredness, and stress—conditions that are helped with yoga. The most common poor posture across all age groups is the Forward Head Position (FHP). For example, a forward-head position, with its accompanying rounded shoulders, curved upper back, and resulting muscular tension, will often cause headaches (and even known to cause TMJ). Because the muscles of the neck and upper back connect to the head, tension in the neck can be referred to the forehead and behind the eyes, causing headaches.
Asanas that stretch the upper back, shoulders, and neck relax the muscles and allow oxygen-rich blood to flow to the brain. The increased body awareness resulting from yoga practice can even help predict the onset of a headache and stop it early in its course.
Stressed postural muscles may also cause nausea, generalized fatigue, lack of concentration, and visual disturbances. Chronically overworked, the muscles become fatigued and go into spasm. This is compared to a “charley horse”. Just as we would stretch a calf muscle in spasm, we need to stretch the “headache muscles” to bring relief. We should retrain the upper back to extend, the chest to open, the shoulders to roll back and down, and the head to rest on the midline.
A yoga practice which focuses on alignment and somatic awareness provides the tools for this retraining. The most common cause of headaches is the forward head position, with rounded shoulders, a curved upper back, and the accompanying muscular tension. “Anything that distorts the spinal curves has the potential to cause headaches,”
Dysfunctional breathing patterns contribute to headaches.
Deep, diaphragmatic breathing releases contracted muscles in the upper body and belly. Headache sufferers often “live in their heads; they don’t breathe fully. They need time to be in the body and develop the balance between the mental and physical parts of themselves.”
If breathwork practices interest you, consider taking my next Meditation / Breathwork “How-To” class. Sign up for my newsletter and “like” Better Day Yoga on Facebook to be in the know!
Sources: https://www.yogajournal.com/?s=seated%20forward%20bend
Spiritual aspects of Spinal Flexion:
Hatha Yoga is often been referred to as a “going within” to get to know the nature of your true self. What better way to accomplish this than spinal flexion. Embracing the “forehead to the knee/thigh” direction suggestion as explained above in the “alternative” option, truly curls you into yourself. As you hone into where you are sensing the stretch sensation, you are practicing pratyahara—control of the senses; as well as dharana—concentration and cultivating inner perceptual awareness. Experiencing the slow evolution of this pose—the slower the better—allows you to detach from the outer world and truly get to know yourself. You learn what’s going on in your body. You become intimately aware of your inner workings. This pose invites you to explore your inner self.
A well distributed stretch relaxes the nervous system so that one area is not overwhelmed. Relaxing and rejuvenating the nervous system is one of the hallmarks of spinal flexion. Curling inward is a protective reflex for many animals in nature—one of which is the armadillo. An armadillo’s armor is the shield it carries on its back. Their most vulnerable area is their underside—not unlike us humans.
I like to tell my students that unless you practice some form of relaxation / affirmation / meditation regularly, it won’t be “in your back pocket” to use when you really need it. It will be the last thing on your mind when you’re stressed. Armadillos teach you to carry your armor with you so you are able to use it when necessary. (Source: Animal Speak by Ted Andrews)
The fight-flight response of our sympathetic nervous system stems from fear. Stress stems from fear. By practicing the curling in of spinal flexion with the intention of focusing inward and honing in on the minute sensations you are experiencing, you are able to turn off your constant fight-flight response and turn on your rest and digest parasympathetic nervous system rejuvenators. It’s a mini-meditation asana.
Paschimottanasana / spinal flexion stimulates your first three chakras—your physical chakras. These are your stabilizing, grounding, creative, sensual, flowing energies as well as your energies of willpower and discipline. Knowing that what you need is found within and that curling inward isn’t a sign of weakness but an avenue to secure your inner strength and direction is the gift of Paschimottanasana.
Your drishti, or focused gaze, in this pose pulls you further into your very core, concentrating your intention inward, inward, inward. Intending to feel the sensation across the whole back side of your body reminds you that you are aiming for expansion in all areas—both on and off the mat. Lighting up your whole back line connects you energetically top to bottom. Your central meridian curls inward which empowers your governing meridian to vibrate outward (see photo below for a visual on where the meridians are in your body). They are partners and in their connection you are strengthened. This pose reminds you there is a time to curl inward and a time to express outward.
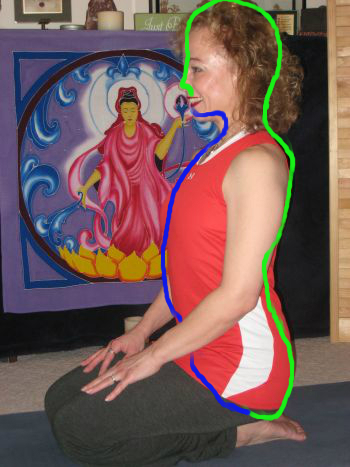
(Blue line represents your central meridian starting from the pubic bone and ending at the lower lip. Bright green line represents your governing meridian starting from the tailbone and ends between nose and upper lip)
