I chose this pose to highlight the opening theme about “being your own hero”. This pose is also used as a meditation posture which makes it a perfect pose to meditate on being your own hero.
Benefits:
- Improves circulation to the pelvis and in the feet
- Loosens thighs, knees, and ankles
- Strengthens the arches—in particular the transverse arch
- Improves digestion and relieves gas
- Helps relieve the symptoms of menopause
- Reduces swelling of the legs during pregnancy (through second trimester). *Note contraindication below.
- Counterbalances hip-opening postures
- Calms the brain for meditation
- Alleviates high blood pressure
- Therapeutic for asthma
Propped version benefits using rolled blankets and a block or bolsters:
- Reduces stiffness in the hip joints
- Reduces inflammation in the blood vessels caused by standing for long periods
- Alleviates pain or inflammation in the knees and tones knee cartilage
- Relieves gout and rheumatic pain
- Tones the hamstring muscles
- Strengthens the arches of the feet, and relieves pain in the calves, ankles and heels
Contraindications & Cautions:
- Knee or ankle injury
- Total hip replacement
- Heart problems
- Avoid practicing this asana if you have a headache, migraine, or diarrhea.
- Do not stay in this pose for more than three to five breaths if you suffer from varicose veins in your legs.
- Some women in the last trimester of pregnancy find that their knee ligaments are too loose for them to practice comfortably, or that their thighs or lower legs are too swollen or them to enjoy the pose for more than just a couple of breaths.
“Hero-Heroine Pose is a paradox. Although it is not recommended for those who have any variety of knee injuries or undiagnosed knee pain, many students have found that it can help cure these very dysfunctions. Therefore, if you have significant knee pain or a knee injury, then practice this pose only under the guidance of an experienced yoga teacher.” 30 Essential Yoga Poses For Beginning Students and Their Teachers, by Judith Lasater, Ph.D., P.T.
On a more personal note, my original 200-hour training through YogaFit® does not practice hero pose. I was introduced to hero’s pose more in-depth during my second 200-hour training with TeriLeigh, LLC. TeriLeigh had been hit by a car while walking across the street, which badly injured her knees. She started with hero’s pose using several blocks and gradually lowered herself down. Per TeriLeigh, her doctor was amazed at how quickly her knees healed. Enough said. “Practiced safely, this is an excellent pose for the knees.” ~ TeriLeigh.
Before going into hero’s pose, always warm-up with a few sun salutations, standing poses and forward folds. If you experience cramping in the legs while doing this pose, stretch out into staff pose (seated with the legs out stretched out straight and heels flexed.)
Alignment Cues: Start by kneeling on all fours on the floor. Place your feet angled slightly wider than your hips and bring your knees together, if possible; or allow for some space between the knees for comfort, if necessary.
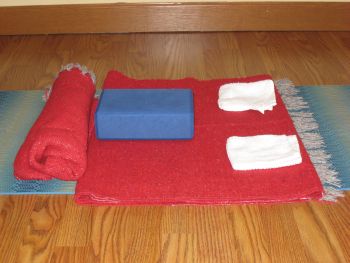
I like to err on the side of caution, so I recommend that all of my students automatically start with two four-inch blocks stacked one over the other and placed with the long side of the blocks perpendicular to the shins and in-between the legs. Experiment with the block’s position to be either parallel or perpendicular to the shins for comfort and support, making sure the sits bones (the bony part of the buttocks you feel when you sit on a hard surface) are evenly supported on the block. Then have a three-inch block handy to replace one or both of the four-inch blocks for increased sensation. For those who have really tight hips, or really tender knees, I suggest you add the three-inch block to the stack, or perhaps a third four-inch block to your initial stack. Have extra blocks and/or blankets handy if you need more height, or want a softer seat. You can always pull blocks out for more sensation.
Also consider the following precautions before you go into the seated position:
Before you go into a seated position, sit half-way down and grab the calves of each leg with each hand and roll them out and away from the knees to allow for a deeper seat with the calves out of the way.
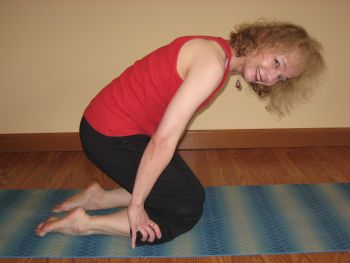
Some versions suggest pulling the calf muscles from the top near the knee down toward the ankles. I prefer rolling them out and away. Once seated, your big and little toes will stay in the same plane, i.e., even left to right. One is not above or below the other, the toes are pointing straight back, and the soles of the feet are facing the ceiling. This means the tops of your feet will rest on the floor (or blanket prop—see below). Sometimes it helps to place the palms of the hands onto the outer edges of the feet and gently push on the pinky toe side of the foot if the pinkies are floating up, realigning the pinkies into the same plane as the big toes. The buttocks will rest between the heels.
It is very important that the sits bones make contact with the blocks evenly left to right. If they are not making contact, it is imperative you add another block until they do. Once in the pose, you’ll feel sensation. You want sensation, right? Otherwise why are you doing the pose? It’s what I refer to as a crescendo-ing sensation that you don’t want. You don’t want a building sensation. The sensation should be a mellow stretch, in my opinion.
One last thing, before you go into the pose: Know that you can come out of the pose whenever you start to feel like you are in discomfort, or you’ve had enough (which is true in general, but I like to stress that for this pose since so many of my students are very protective of their knees.)
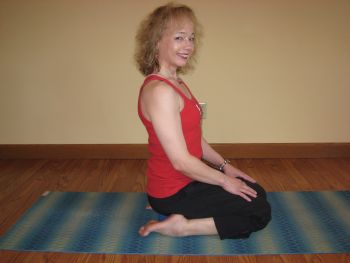
Sit with the chest stretched out, the top of the sternum lifted, collar bones wide, and the palms resting on the thighs. You are simultaneously rooting down through the pelvis and rising up through the spine. I love the dual energies creating length and expression in the pose.
Typically, a beginner will stay in the pose for only a short time, 30-60 seconds. This pose is also used as a meditation posture so you can work up to sitting for longer periods. I often review Donna Eden’s “four thumps” from her book, Energy Medicine, while my students are in hero’s pose.
For a deeper pose: Once you have mastered the above pose and require no props below the sits bones, you can advance to Reclining Hero’s Pose / Supta Virasana (not shown). Since I do not practice this version, I won’t be going into the details here.
Add a prop: I’ve already discussed using blocks at the get-go. Here are some extra props for ankle comfort and more knee comfort.
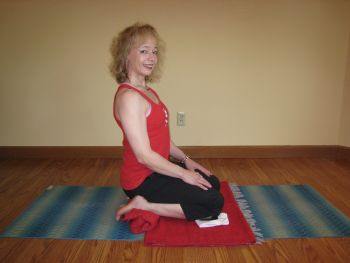
- Add a folded blanket on the mat underneath the whole base of the pose, and add an extra washcloth folded under each knee as well as a rolled blanket for the ankles to rest on. The block below is pictured perpendicular to where the shins would fall. That worked best for me, here. So long as your sits bones are evenly supported on the block, you’re good. Experiment with the block being parallel or perpendicular for comfort and support.

- Alternatively, you can place two bolsters parallel to each other as the “base” support in lieu of the folded blanket on the mat. This also takes the place of needing a blanket to rest the ankles on. Kneel on the bolsters and add a rolled blanket on your shins. Also add a folded blanket to sit on instead of a block or blocks between the legs. I’m thinking a block on the bolsters wouldn’t work as well on a soft surface. (Not Shown.)
To come out of the pose lift up evenly with hands pushed onto the floor and carefully navigate around the props to stretch the legs out in front of you. It feels good to bounce the legs a few times, if you like.
Spiritual aspects of Hero’s pose: This pose is named after the hero within each of us. In this pose, it is imperative that you create your own personal foundation. It takes personal knowledge of both your temperament as well as your physical limitations to practice Hero’s Pose safely. Many want to run from any sensation, preferring to stay where they are. Discomfort is unavoidable in life so learning how to safely work with your discomforts, your ups and downs, enables you to live your life and overcome the discomforts. Hero’s pose invites you to know the truth for yourself.
“Find the answer in your own words. Ground yourself in the foundation of your own experience. You cannot know something until you discover it for yourself.” ~ Yoga path Cards by Susan Woldman
This pose demands that you be humble in your approach keeping your limitations and requirements in mind, yet noble as you hold the pose reflecting the hero within.
Sources:
- http://www.yogajournal.com/poses/490
- 30 Essential Yoga Poses For Beginning Students and Their Teachers, by Judith Lasater, Ph.D., P.T.
- Yoga for Arthritis by Loren Fishman, MD, an Ellen Saltonstall
- Anatomy of Yoga, An Instructor’s Inside Guide to Improving Your Poses, by Dr. Abigail Ellsworth
- B.K.S. Iyengar, Yoga The Path to Holistic Health. The definitive illustrated guide by the world’s leading yoga teacher, by B.K.S. Iyengar